|
|
|
|
| TalkTalk Huawei DN372T Troubleshooting - Hard Drive Information |
|
| Please note that this website is not affiliated with TalkTalk, Huawei or YouView in any official capacity |
 Drive type and model
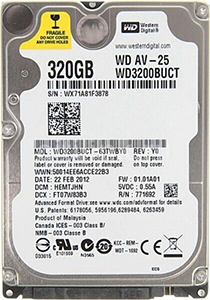
The Huawei DN372T comes fitted with a 320Gb hard drive - no other sizes are supported. In all the boxes I've seen, this is a Western Digital AV-25 drive, model number WD3200BUCT. It is the same physical size as a laptop hard drive (2.5" form factor),
using a SATA interface. Being an AV (Audio Visual) drive, it is especially configured and optimised for sustained constant use and may lack the consistency verification expected of regular desktop drives.
Accessing and removing the drive
Ensure all cables are disconnected from the box before you start.
You can get to the hard drive by removing the 3 shorter screws along the top edge of the back panel of the box and the 6 longer screws on the underside of the box (one of the central screws may be covered by a black/red warranty sticker). The top
cover will then lift off. The power and SATA cables can then be removed from the connector on the drive itself. The caddy holding the drive is secured by 4 black screws and the drive is fixed to the caddy using 4 silver screws on the underside of the caddy.
Replacing a faulty drive
Should your hard drive develop a fault, which can be verified by using SMART short and long tests and by checking for bad sectors as shown in the SMART statistics, it is possible to replace the drive. This unfortunately means you will lose any
recordings stored on the faulty hard drive. I would advise only purchasing a 320Gb drive, preferably the exact or similar model number to your faulty drive. Once you've connected the replacement hard drive, you will find that the DN372T boots up
with an error message and you will be taken to the maintenance menu. Ensure you have an ethernet cable connected and select the "Internet/USB Recovery, delete recordings" option. This option will unpair your old drive from the box and pair the new
drive. It will automatically format and partition the drive correctly and install the device and YouView software on the drive. After this completes, the box will restart and will be factory reset, so you then just need to complete the setup (a
further software update may be installed at this point).
Disk format and partitioning
Like most PVRs, the DN372T uses a Linux based operating system. As such, you can connect the drive to any other Linux system to manage it. It is partitioned in GPT (GUID Partition Table) format, with 6 partitions in total, with 2 of them being formatted
using the XFS filesystem. When the drive is read by partitioning software on Linux, you may find that they complain that the secondary/backup GPT is corrupt - the software on the DN372T that partitions the drive only sets the primary GPT, so this warning
can be ignored. The DN372T software will usually automatically partition and format the drive, so the below is for informational purposes only:
| Partition # | Name | Start Sector | End Sector | Sectors | Size | Filesystem |
|---|
| Unallocated | 1 | 1,050,623 | 1,050,623 | 513 MiB |
| 1 | software | 1,050,624 | 2,099,199 | 1,048,576 | 512 MiB |
| 2 | download | 2,099,200 | 3,147,775 | 1,048,576 | 512 MiB |
| 3 | userdata | 3,147,776 | 3,327,999 | 180,224 | 88 MiB |
| 4 | mediabuffer | 3,328,000 | 30,590,975 | 27,262,976 | 13 GiB | XFS |
| 5 | var | 30,590,976 | 51,562,495 | 20,971,520 | 10 GiB |
| 6 | media | 51,562,496 | 625,133,568 | 573,571,073 | 273.5 GiB | XFS |
| Unallocated | 625,133,569 | 625,142,446 | 8878 | 4.33 MiB |
The XFS formatted media partitions
The only two partitions that you will be able to mount in Linux are the two XFS partitions. The media partition will contain all your recordings, whilst the mediabuffer partition contains the live tv / timeshift buffer and any other miscellaneous data.
Sometimes, one of these partitions, usually the media partition, can get itself into a state where it contains filesystem errors. This can cause various symptoms, but usually means that you cannot record anything or playback any existing recordings.
Unfortunately, the software on the box is not able to recover this. In Linux, you can usually fix this issue by running xfs_repair on the affected partition (xfs_repair -L may be required if the journal is too corrupt). After this
process completes, you should then find that playback and recording is then back to normal.
Swapping drives between different boxes
The hard drive is fundamentally paired with the box it has been installed in, so it cannot be swapped and used whilst retaining the recordings. If you place the drive from one DN372T into another DN372T, you'll get an error message and it won't boot.
The only way to get a DN372T to accept another hard drive is to use the Internet/USB recovery mode option in the maintenance menu, which will wipe the drive and any recordings will be lost - once you have done this, the box will no longer be able to use
the hard drive that was originally installed (you'll lose access to any recordings on the original hard drive, with no way to regain access).
Transferring recordings
It is not possible to transfer recordings from one DN372T so that they can be played on another DN372T - the files can physically be copied to another drive using Linux, but the other box will delete them should you try to use that drive.
So, unfortunately, should your box suffer a hardware failure (not the hard drive), there is no way to move those recordings to a replacement DN372T. The only thing that can be done is, using Linux, on the media partition, you will find
*.dat and *.idx files - the *.dat files are the recorded transport streams. These files can be transferred off the drive and played back in a video player, such as VLC. However, this only works for SD recordings (HD recordings are encrypted and
cannot be played on anything but the original DN372T).
|
|
|
|
|